dreamweaver templates | responsive designs | frontpage templates | expression web templates | wordpress templates | css templates | website templates

Home > Help files >> Frontpage navigation

Frontpage navigation

Build or Change FrontPage Navigation

One of the features of FrontPage is its built-in navigation component. A few of our FrontPage templates use it and we will show you how to modify it to meet the needs of your website. However, let's look first at how to insert FrontPage navigation if you are building a website from scratch.

New Navigation Bar - Text

1. Build your Home page and one on the level below that, such as About Us (nav view 2). Be sure to leave a table cell open for the nav bar on each page.

2. Open Navigation View in FrontPage. From the Folder List, drag the Home page file (index.htm) onto the blue-green area if it is not already there.

View 2 Navigation Structure
nav view 2


3. Drag the About Us page file (or the second page you made) onto the blue-green area below the Home page so they become attached. (nav view 3)

4. Click once in the blue-green area and return to Page View.

5. Place your cursor at the top of the empty nav bar cell. From the menu at the top of the page click on Insert > Navigation Bar. The Navigation Bar Properties dialog box will appear.

Frontpage navigation
nav view 3


6. Home page: Select Child level; Home page; Horizontal or Vertical depending how your nav bar is to appear; and Text (nav view 4). Click OK.

Level below Home page: Select Same level; Home page; Horizontal or Vertical depending how your nav bar is to appear; and Text (nav view 4). Click OK.

7. Check your page. The navigation bar should be in place.

Frontpage navigation
click to enlarge

nav view 4


Parent Level...Child Level...Same Level...Still Confused?

When you modify Navigation Bar Properties, think about the page on which you are placing the nav bar and how it is related to those on the level above and below.

The Home page is always a parent. There are no levels above it. See nav view 5. Since you will want to display links for the pages on the level below it, you will need to select Child pages in the dialog box. It is a good idea to also have a Home button on your nav bar so select Home as well. There is no way, with FrontPage Navigation, to display three levels of pages at the same time in the same nav bar.

It is also possible to have pages on the same level as the Home page. These are not Child pages. To display Home and any other pages on that level, select Top Level in the dialog box. This will cancel the ability to choose Child pages for that nav bar.

When you move down to the next level of pages to modify your Navigation Bar Properties, you will need to readjust your thinking. Look at the list or navigation structure you drew out on paper earlier. If you did not do that exercise you may find it beneficial to do so now. What pages do you wish to display and how are they related? Since you will want your nav bar to appear the same as on the Home page, you will need to select Same Level and Home.


Frontpage navigation
nav view 5

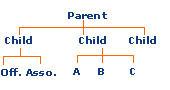
To make things even more interesting, your Child page may have become a Parent page. See nav view 6. If it has, it would be a good idea to implement a separate nav bar for its Child pages. This was referred to earlier as secondary navigation. See the General Information page.

In the case of a second level nav bar you will actually be dealing with pages on the third line of the structure. Usually, you will want to select Same Level in the Navigation Bar Properties dialog box.

Avoid selecting Parent page beneath Home page on the right side of the Navigation Bar Properties dialog box. It will create a link that says "Up" which has no meaning to most Internet users.

8. If you wish, you can select the nav bar and change the font size and/or weight (bold or normal). Link colors will be determined by the link colors you have chosen for the rest of the site.

This is a good way to add navigation to the bottom of your web page. FrontPage 2000 will always add brackets around a vertical text nav bar. FrontPage 2002 offers different styles to separate links, but your server must have 2002 extensions installed for them to display properly.

Hint - If you have both a main nav bar and textual navigation at the bottom of your page, modify both while you are on the same page. The settings will be the same with the possible exception of Text / Buttons.

9. To make more pages on the same navigation level, open a page > go to File > Save As > assign a new Page title by clicking on Change > type in the new title > OK > type in a new File name. Save. This will give you an exact copy of the first page without altering the first page. Drag the new page's file name into Navigation View along side the About Us page (or whatever page you created). FrontPage will automatically add the new page to the navigation bar. To finish the new page, insert appropriate content.

New Navigation Bar - Buttons

You will need graphics for each stage of your buttons. They should not have page names included on them. FrontPage will insert names.

The only way to use buttons with FrontPage Navigation is to utilize a theme. But don't despair. It is a simple matter to modify a theme using your own graphics, thus taking advantage of FrontPage's ability to write JavaScript for rollover effects or simply using graphics for your menu.

Follow steps 1-5 above. On step 6, click Buttons instead of Text. See step 9 for adding pages.

Modifying FrontPage Navigation in a Template

Several pages have been created for you in our FrontPage templates. However, it is almost certain you will need to make some changes to customize your template.

Changing Button Names

Button names are based on the Title of the page. They must be kept short because FrontPage will not wrap button names. They will appear on one line and will need to fit within the space alloted on the button. In Navigation View right click on the page icon as seen in nav view 3; select Rename; type in a new name; click in the blue-green area.

You will also probably wish to change the file name of the page to avoid confusion. Right click on the file name in the Folder List; select Rename; type in a new file name, Enter.

File names should contain lower case letters, numbers, hyphens, and/or underscores. They should not contain spaces.

cat.htm, Cat.htm, and CAT.htm are not the same file. Writing file names in all lower case letters will help keep things in order.

Adding a Page

See step 9 above.

Deleting a Page

In Navigation View, right click on the icon of the page you wish to remove > Delete > Delete this page from the Web > OK.

- Navigation tutorial - general information

Frontpage navigation
nav view 6

Features
News

Frontpage CSS Templates

New section with 100% CSS based XHTML valid Frontpage templates.

Microsoft Expression Web Templates

New section containing templates Microsoft's new Expression Web program.

Dreamweaver CSS Templates

New section with 100% CSS based XHTML valid Dreamweaver templates.

Microsoft Expression Web Templates

New section containing templates Microsoft's new Expression Web program.

Website Templates

We now have a selection of website templates with full PSD source files.

CSS Templates

New range of 100% CSS layouts and XHTML compatible.

read more read more...


Resellers
Check out our reseller program and earn 20% commission on all templates sold through your site - that's over $30 per sale for our ecommerce plus templates.

read more read more...

Affiliate program
5% discount promo

Find us on Twitter

Follow us on twitter

We accept credit card and Paypal paymentsFind us on FacebookFollow us on twitterJoin us on Linkedin

Frontpage Templates | Dreamweaver Templates |  Website Templates |  Expression Web Templates
License + Terms | Privacy Policy | Contact us | Help | Shopping Cart

© 2001 - 2024 The Template Store - All Rights Reserved
Shopping cart software by ecommercetemplates.com